Send IR sensor state data with ESP8266 (ESP32)
This guide shows how to read IR receiver state values (0/1) from an ESP8266 (or ESP32) board and send them to Miniviz over HTTP.
It is a lightweight setup for sensor prototyping and quick dashboard validation.
What We'll Do
Read IR sensor state with ESP8266 (ESP32), send data to Miniviz API periodically, then check records and chart the values.
Required Items
- ESP8266 board (Lolin D1 R1, etc.) or ESP32 board (DevKitC, etc.)
- USB cable (data transfer capable)
- IR receiver module (KY-022 / VS1838B / TSOP1838)
- Jumper wires
- Miniviz project ID and token
Steps
- Prepare Arduino IDE for ESP8266 (ESP32)
- Wire the KY-022 sensor to ESP8266 (ESP32)
- Run the sample data sender
- Verify data and create a graph in Miniviz
1. Prepare ESP8266 (ESP32) Development Environment (Arduino IDE)
Install Arduino IDE
Install Arduino IDE from the official Arduino website.
Add ESP8266 / ESP32 Board Package
Install ESP8266 from Board Manager and select your board.
You can name your project esp8266-miniviz or any name you prefer.
Install the ESP32 board package and choose your target board (for example, ESP32 Dev Module).
2. Connect the IR Sensor
Wiring
Connect the KY-022 module as follows.
| KY-022 | ESP8266 (Lolin D1 R1) |
|---|---|
| VCC | 5V |
| OUT | D5 |
| GND | GND |
Use 3.3V for VCC and use a GPIO pin such as GPIO4 for OUT.
Wiring Photo

Sensor Notes
- 3-pin module (GND / VCC / OUT)
- Common IR receiver chips: VS1838B / TSOP1838 compatible
- Supports typical 38kHz remote control signals
3. Run the Data Transmission Sample
Connect ESP8266 via USB and paste the code below into Arduino IDE.
Replace ssid, password, project_id, and token with your own values.
Get Miniviz Project ID and Token
Before running the code, create a target project in Miniviz and collect credentials.
- Log in to Miniviz
- Create a new project
- Open the project details and copy
project_idandtoken - Set those values in the sample code (
project_id/token)
For details, see QuickStart.
Replace these lines while keeping the rest of the logic unchanged:
#include <WiFi.h>
#include <HTTPClient.h>
const int irPin = 4; // Example: GPIO4
Sample Code
#include <ESP8266WiFi.h>
#include <ESP8266HTTPClient.h>

const char* ssid = "YOUR_WIFI_SSID";
const char* password = "YOUR_WIFI_PASSWORD";
const char *project_id = "YOUR_PROJECT_ID";
const char *token = "YOUR_TOKEN";

String endpoint = String("https://api.miniviz.net/api/project/") +
                  project_id + "?token=" + token;

const int irPin = D5;

void connectWiFi() {
  Serial.println("Connecting to Wi-Fi...");
  WiFi.mode(WIFI_STA);
  WiFi.begin(ssid, password);
  int retry = 0;
  while (WiFi.status() != WL_CONNECTED && retry < 30) {
    delay(300);
    Serial.print(".");
    retry++;
  }
  Serial.println();
  if (WiFi.status() == WL_CONNECTED) Serial.println("Wi-Fi connected");
  else Serial.println("Wi-Fi connection failed");
}

void syncTime() {
  Serial.println("Syncing NTP...");
  configTime(0, 0, "ntp.nict.jp", "time.google.com");
  struct tm timeinfo;
  while (!getLocalTime(&timeinfo)) {
    delay(200);
    Serial.print("*");
  }
  Serial.println("\nTime synced");
}

uint64_t getTimestampMs() {
  struct timeval tv;
  gettimeofday(&tv, NULL);
  return (uint64_t)tv.tv_sec * 1000ULL + (tv.tv_usec / 1000ULL);
}

void sendToMiniviz(int irState) {
  if (WiFi.status() != WL_CONNECTED) connectWiFi();

  WiFiClientSecure client;
  client.setInsecure();

  HTTPClient http;
  http.begin(client, endpoint);
  http.addHeader("Content-Type", "application/json");

  uint64_t ts = getTimestampMs();

  String body = "{";
  body += "\"timestamp\":" + String(ts) + ",";
  body += "\"label_key\":\"esp8266_home\",";
  body += "\"payload\":{";
  body += "\"value\":" + String(irState);
  body += "}}";

  int code = http.POST(body);
  Serial.println("HTTP code: " + String(code));
  Serial.println(http.getString());
  http.end();
}

void setup() {
  Serial.begin(115200);
  pinMode(irPin, INPUT);
  delay(1000);
  connectWiFi();
  syncTime();
}

void loop() {
  int irState = digitalRead(irPin);
  Serial.print("IR State: ");
  Serial.println(irState == LOW ? "Signal Detected" : "No Signal");
  sendToMiniviz(irState);
  delay(500);
}
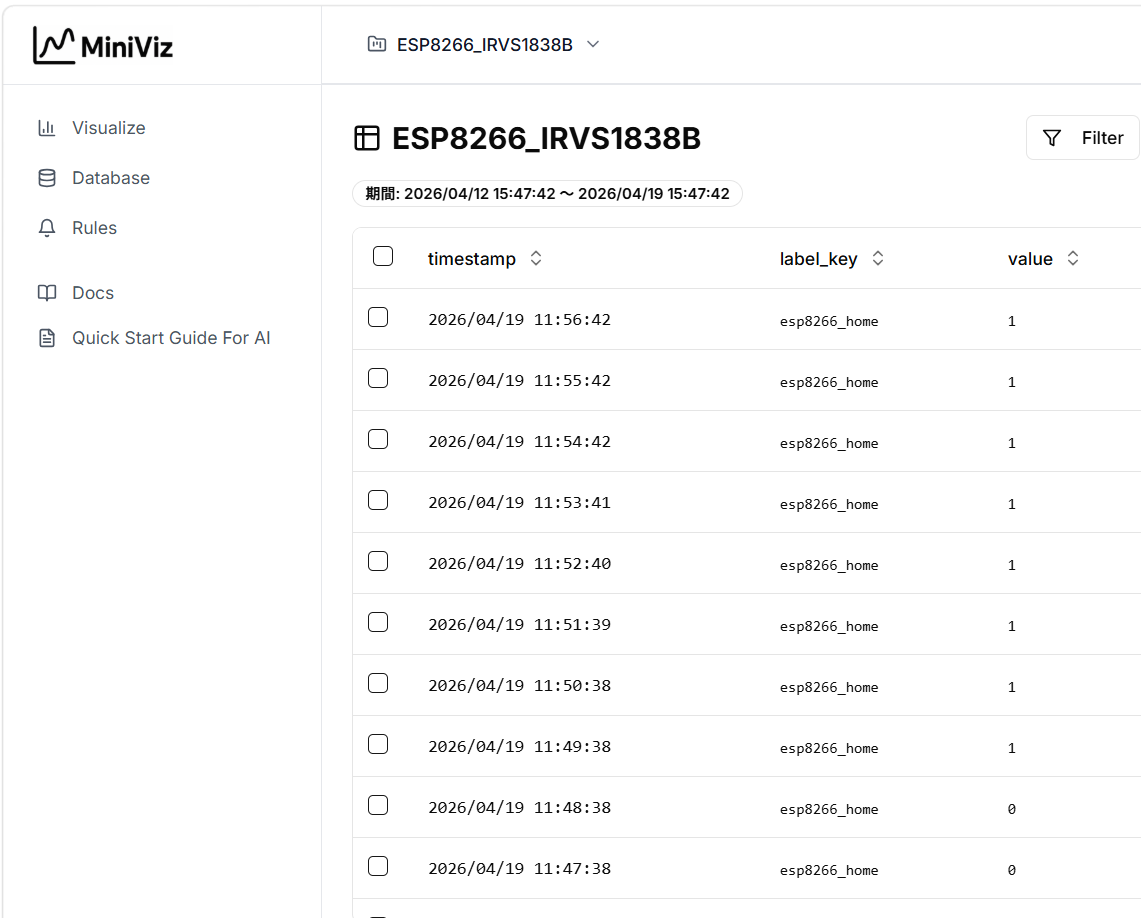
4. Verify Data in Miniviz
Check Incoming Data
- Log in to Miniviz
- Open the
Databasescreen - Confirm records with
label_key: esp8266_home
Use a distinct label_key (for example, esp32_home) so data is easy to identify by device.
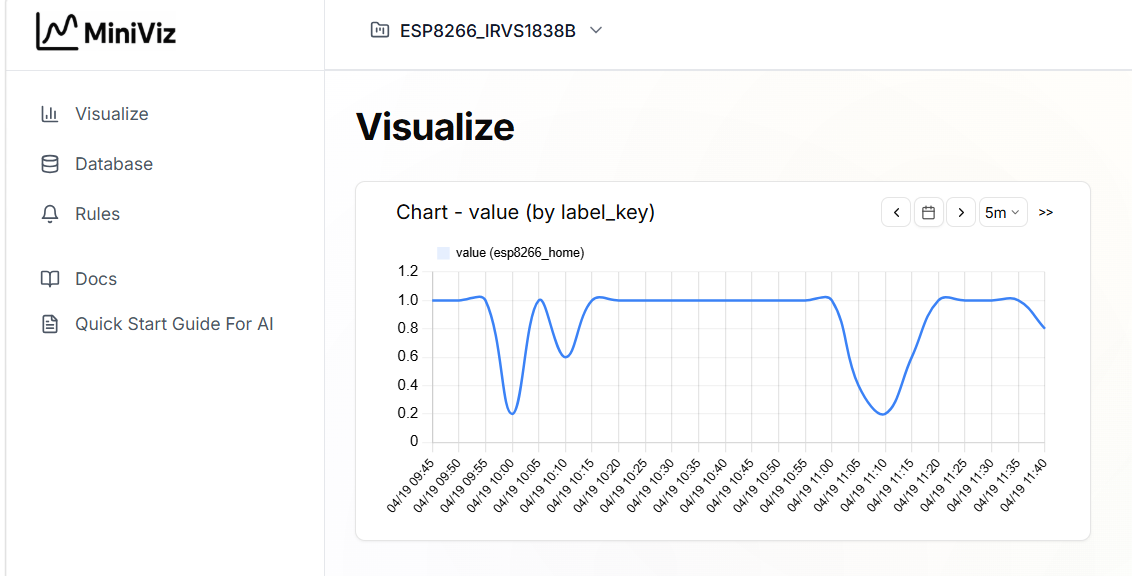
Create a Graph
Open Viz, create a line chart, and select payload.value to visualize state transitions.
Summary
With ESP8266 (ESP32) and an IR module, you can quickly send state values to Miniviz and visualize behavior.
After confirming this baseline flow, you can extend it with more sensors or automation.