Everything you need for IoT in one stop, quickly
Store • Visualize • Notify
Just send HTTP requests from edge devices
Simply send data from sensors or devices
• timestamp: UNIX time in milliseconds(ex. 1715395200000)
• label_key: Label to identify data (e.g., device name)
• payload: Sensor data body (up to 8 keys)
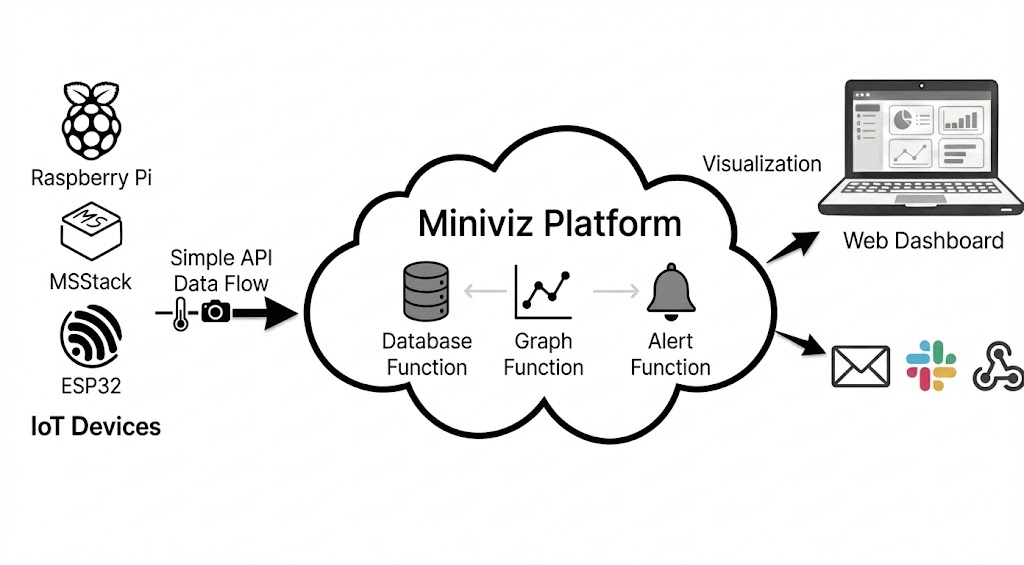
Sample Images
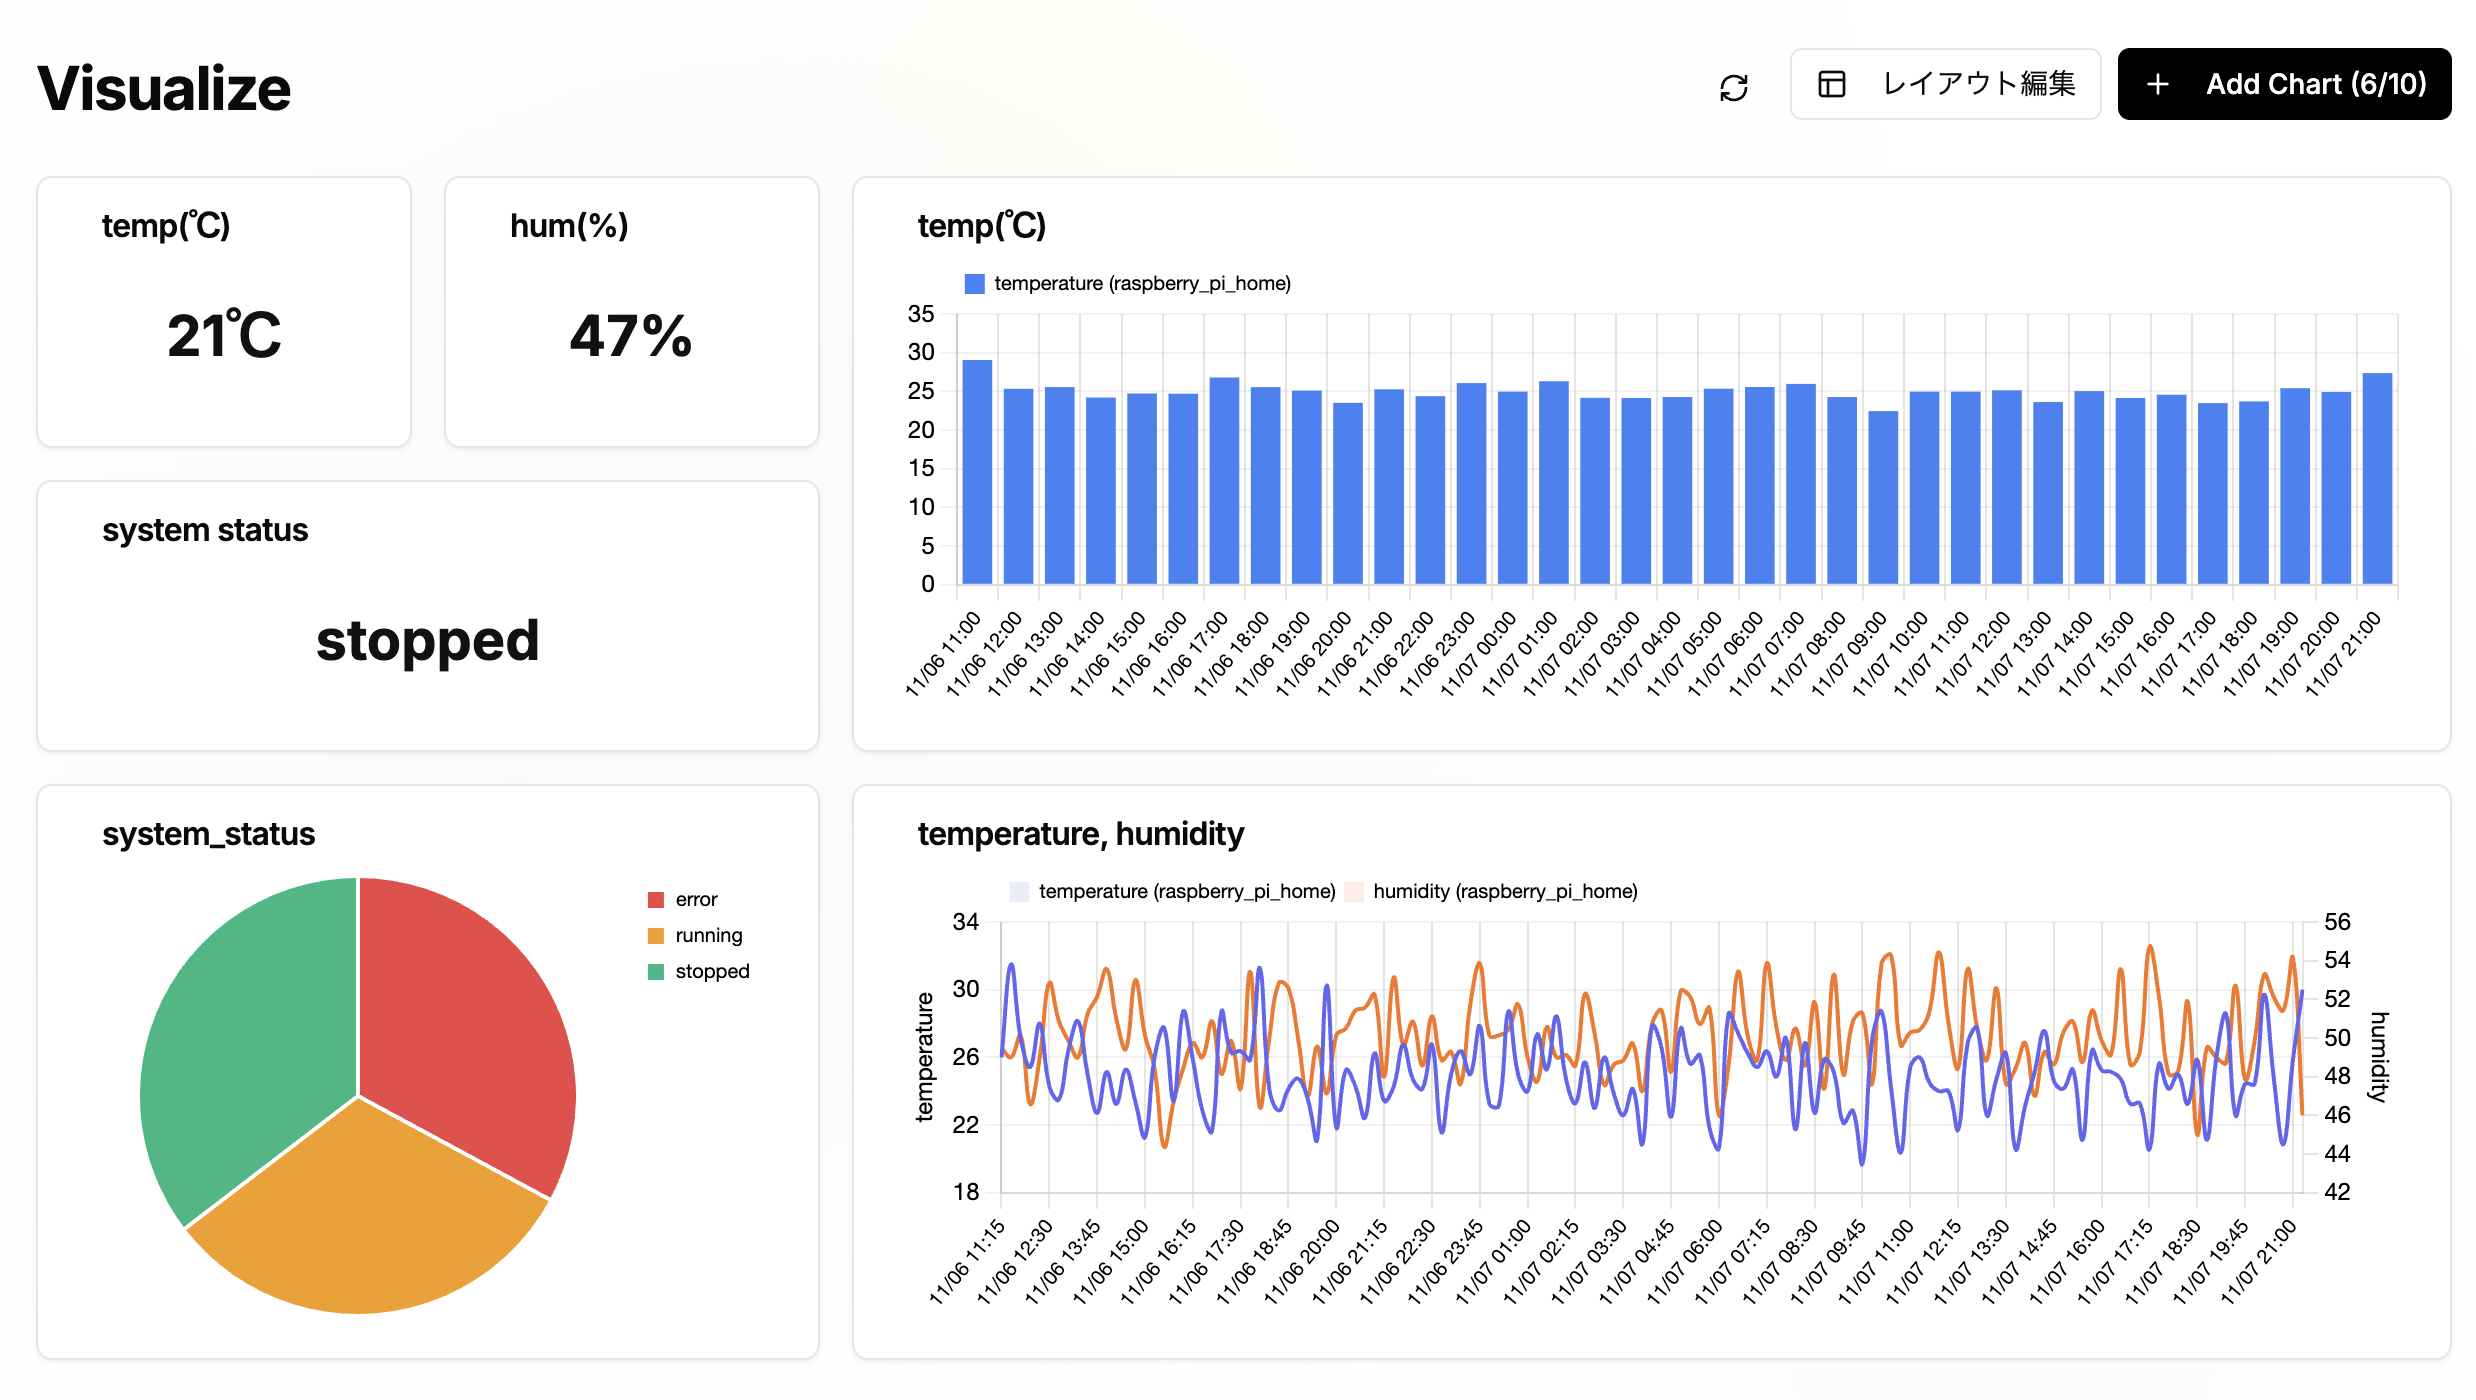
Real-time Dashboard
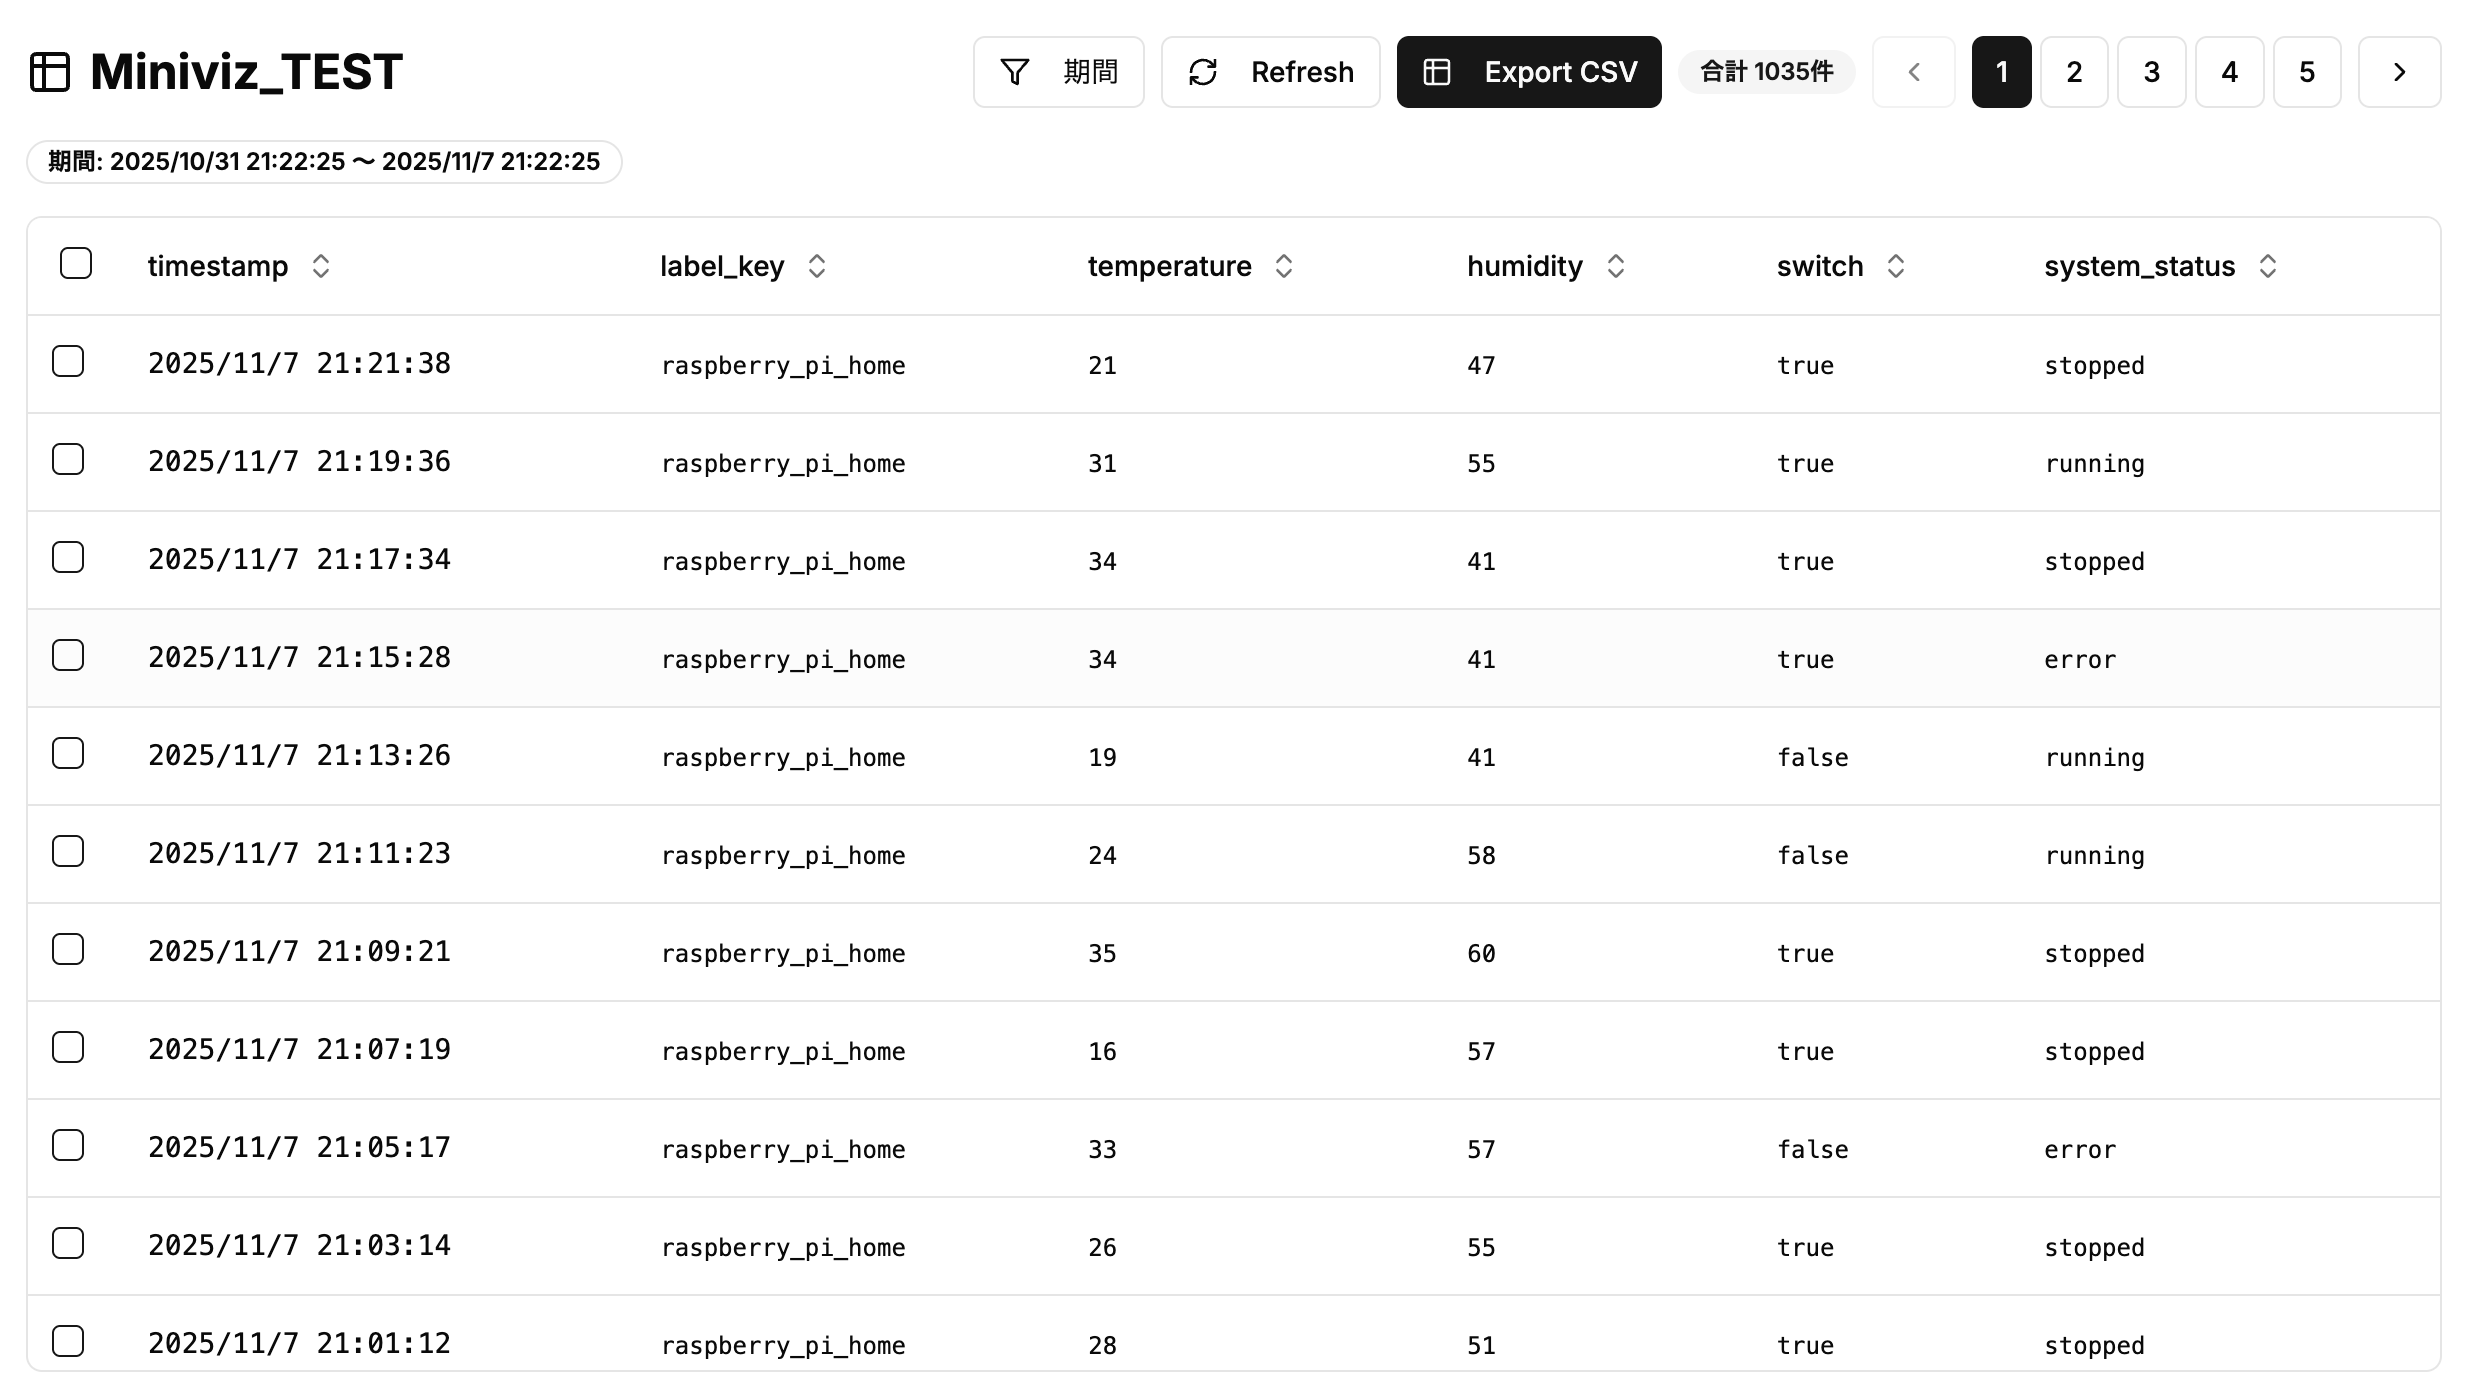
Data Management Screen
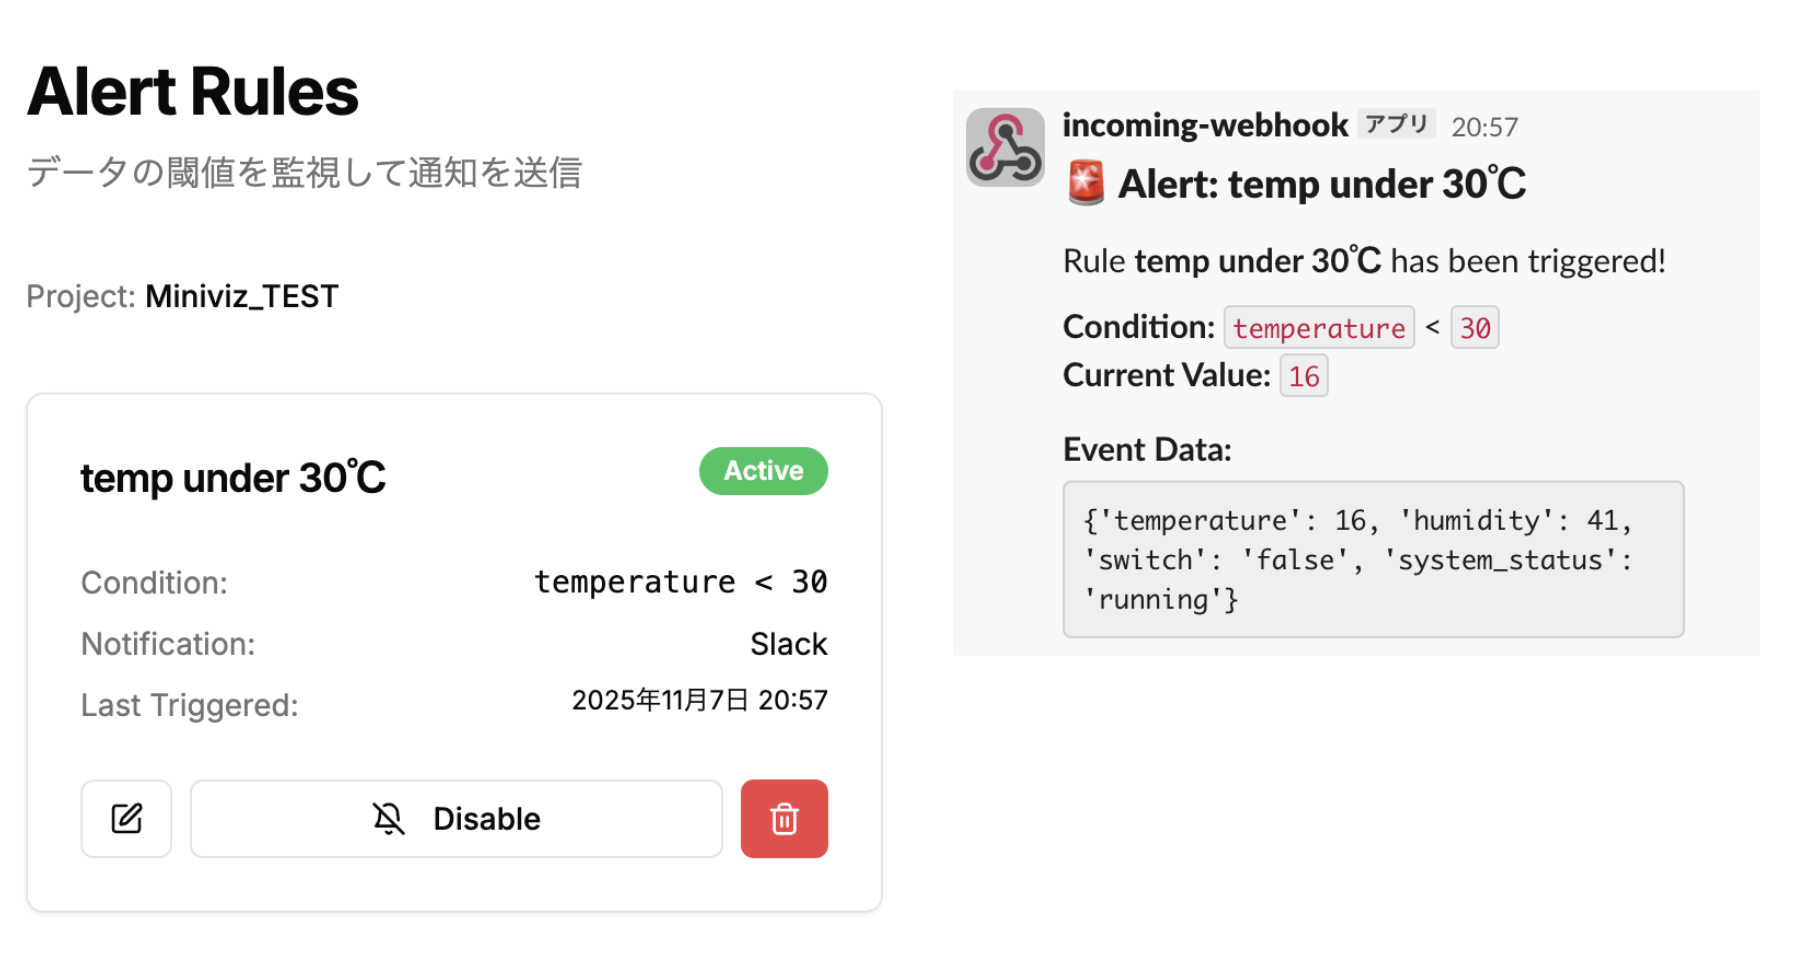
Alert Settings
Simple Database
Manage data with an intuitive table interface. CSV export available.
Versatile Charts
Data is instantly graphed without complicated setup. Check experimental results on the spot.
Real-time Alerts
Detect anomalies and send alerts instantly via Email. Useful for simple monitoring.
Image Preview Support
Uploaded image data is saved and supports list and preview display.
(※Pro Plan Only※)
UseCase
For Experiments & DIY
Send data from Raspberry Pi or ESP32 via HTTP requests. Visualize sensor logs in real time without coding.
For Education & Learning
Students can see temperature or motion data update live. Perfect for IoT demos.
For Individual Makers & DIY
Simple IoT dashboard ready to use without complex environment setup.
Pricing Plans
Choose the plan that's right for you
Free Plan
For personal use & learning
- Basic charts
- Database
- Projects: 1
- Data send interval: 90 seconds
- Data retention: 30 days
- External alerts: 1 rule/project
Pro Plan
For individual developers & small teams
- All Free plan features
- Projects: 3
- Data send interval: 15 seconds
- Data retention: 180 days
- External alerts: 5 rules/project
- Image storage & visualization
Enterprise Plan
For enterprises & organizations
- All Pro plan features
- Technical support
- PoC/Development support
We provide flexible support from technical assistance to development support. Please contact us for details.
Contact UsQuick Start Guide For AI
When asking questions to an AI, copy and paste this entire document.
# Miniviz Quick Start Guide (For AI)

## 📋 About This Document

This document is a complete guide on how to use Miniviz (a BI platform for IoT systems). When asking questions to an AI, paste this entire document for reference.

**How to Use:**
1. Copy this entire document and paste it to an AI
2. Ask specific questions like "I want to implement XX with Miniviz" or "How do I send △△ using Miniviz API?"
3. The AI will reference this document to provide answers

**Information Included in This Document:**
- Basic usage of Miniviz (7 steps)
- Complete data transmission API specification (endpoints, request format, constraints)
- Complete image transmission API specification (Pro plan only)
- Sample code (curl, Python)
- Data type constraints and limitations

**Key Points:**
- Data transmission API: `POST https://api.miniviz.net/api/project/{project_id}?token={token}`
- Image transmission API: `POST https://api.miniviz.net/api/project/{project_id}/image?token={token}` (Pro plan only)
- Payload constraints: Maximum 8 keys, 400 bytes, flat structure only (no nesting)
- Image constraints: 200KB max, 60 seconds/image, JPEG/PNG only

---

## Overall Flow

1. Create/Login to Miniviz Account
2. Create Project
3. (Device Side) Send Data
4. Check Data (Database)
5. Create Charts
6. Configure Notifications
7. (Pro Plan Only) Send Images

---

## 1. Create/Login to Miniviz Account

Register with your email address and password, or login with an existing account.

---

## 2. Create Project

Create a project to manage your data.

### Copy Project ID and Token

Copy the project ID and token as they will be needed in the next step.
- Click the token icon on the right side of the project screen
- The project ID and token will be displayed - copy them
- The token copied here will be used on the device side

---

## 3. (Device Side) Send Data

Send data from the device side.
We recommend first testing data transmission with curl commands or a simple Python script.

### API Endpoint

```
POST https://api.miniviz.net/api/project/{project_id}?token={token}
```

### Request Overview

Data transmission to Miniviz API uses the `POST` method. The request body is in JSON format.

### Request Body

| Field Name | Type | Required | Description |
|------------|------|----------|-------------|
| `timestamp`  | number | Yes | Transmission time (UNIX time in milliseconds) |
| `label_key`  | string | Yes | Label to identify the sender (device name, location, etc.) |
| `payload`    | object | Yes | Actual measurement values. Specify any metric name as key, and numeric or string value |

### Data Type Constraints

#### Acceptable Data Types

**String Type (str)**
- No constraints (no character limit)
- Examples: `"device-001"`, `"Temperature Sensor"`, `"Hello World"`

**Numeric Types**
- **Integer (int)**: No constraints (no range limit)
- **Floating Point (float)**: No constraints (no range limit)
- Examples: `42`, `-10`, `3.14`, `-99.9`

#### Unacceptable Types

The following types cannot be used as `payload` values:
- **Dictionary (dict)**: Nested objects are not allowed
- **Array (list, tuple, set)**: Array types are not allowed
- **Boolean (bool)**: Not allowed (use string `"true"`/`"false"` or numeric `1`/`0`)
- **null/None**: Not allowed

#### Payload Overall Constraints

- **Number of keys**: Maximum 8
- **Size**: Maximum 400 bytes after JSON encoding
- **Structure**: Flat (no nesting)

### Request Example

```json
{
  "timestamp": 1731129600000,
  "label_key": "raspberry_pi_home",
  "payload": {
    "temperature": 25,
    "humidity": 55,
    "switch": "true",
    "system_status": "running"
  }
}
```

### curl Command (Linux/MacOS)

```bash
timestamp_ms=$(( $(date -u +%s) * 1000 ))

curl -X POST \
  "https://api.miniviz.net/api/project/{project_id}?token={token}" \
  -H "Content-Type: application/json" \
  -d "{
        \"timestamp\": ${timestamp_ms},
        \"label_key\": \"Local_PC\",
        \"payload\": {
          \"temperature\": 25,
          \"humidity\": 55,
          \"switch\": \"true\",
          \"system_status\": \"running\"
        }
      }"
```

### Python Sample Code

When using Python, you can send data with code like this:

```python
import time
from datetime import datetime, timezone
import requests

PROJECT_ID = "MINIVIZ_PROJECT_ID"
TOKEN = "MINIVIZ_API_TOKEN"
API_URL = "https://api.miniviz.net"
LABEL_KEY = "Local_PC"
SEND_INTERVAL = 90  # seconds

def send_data():
    url = f"{API_URL}/api/project/{PROJECT_ID}?token={TOKEN}"
    timestamp_ms = int(datetime.now(timezone.utc).timestamp() * 1000)

    response = requests.post(url, json={
        "timestamp": timestamp_ms,
        "label_key": LABEL_KEY,
        "payload": {
            "temperature": 25,
            "humidity": 55,
            "switch": "true",
            "system_status": "running"
        }
    })

    if response.ok:
        data = response.json()
        print(f"Send successful (id={data.get('id')})")
    else:
        print(f"Send failed: {response.status_code} {response.text}")

if __name__ == "__main__":
    print("Starting miniviz data send test (press Ctrl+C to stop)")
    while True:
        send_data()
        time.sleep(SEND_INTERVAL)
```

---

## 4. Check Data (Database)

Check data from the Database menu.
Sent data is saved in the database.

**Note**: If data is not displayed here, data transmission has failed. Please check the device-side logs again.

---

## 5. Create Charts

Create charts from the Visualize menu.
You can configure chart types and data display formats.

- Select chart type (line chart, bar chart, etc.)
- Select sent data as data source
- Verify that the chart displays correctly

---

## 6. Configure Notifications

Configure notification destinations such as Slack and Webhooks.
Configure notifications from the Rules menu.

### Slack Notification Configuration

1. Configure notifications from the Rules menu
2. Enter Slack Webhook URL
3. Set thresholds and conditions
4. Notifications will be sent when the set thresholds are exceeded

---

## 7. Send Images (Pro Plan Only)

Pro plan allows you to send images using the image transmission API.

### API Endpoint

```
POST https://api.miniviz.net/api/project/{project_id}/image?token={token}
```

### Request Overview

Image transmission to Miniviz API uses the `POST` method. The request body is in JSON format. Image data must be base64 encoded before sending.

### Request Body (Image Transmission)

| Field Name | Type | Required | Description |
|------------|------|----------|-------------|
| `timestamp`  | number | Yes | Transmission time (UNIX time in milliseconds) |
| `label_key`  | string | Yes | Label to identify the sender (128 characters max, [A-Za-z0-9-_.:@/] only) |
| `image_name` | string | Yes | Image file name (255 characters max) |
| `image_base64` | string | Yes | Base64 encoded image data (200KB max) |

### Limitations

#### Image Size and Format
- **Image size**: Maximum 200KB per image (size after base64 encoding)
- **Supported formats**: JPEG and PNG only
- **Transmission interval**: 60 seconds/image (managed per label key)
- **Retention period**: 30 days

※Export functionality is scheduled to be released around December 2025.

#### Plan Restrictions
- **Available plans**: Pro plan only (free plan returns 403 error)

### Request Example (Image Transmission)

```json
{
  "timestamp": 1717587812345,
  "label_key": "camera_1",
  "image_name": "image.jpg",
  "image_base64": "base64_encoded_image_data"
}
```

### curl Command (Linux/MacOS) - Image Transmission

```bash
timestamp_ms=$(( $(date -u +%s) * 1000 ))

# Encode image file to base64
image_base64=$(base64 -i image.jpg)

curl -X POST \
  "https://api.miniviz.net/api/project/{project_id}/image?token={token}" \
  -H "Content-Type: application/json" \
  -d "{
        \"timestamp\": ${timestamp_ms},
        \"label_key\": \"camera_1\",
        \"image_name\": \"image.jpg\",
        \"image_base64\": \"${image_base64}\"
      }"
```

### Python Sample Code - Image Transmission

```python
import requests
import base64
import os
from datetime import datetime, timezone

PROJECT_ID = "PROJECT_ID"
TOKEN = "TOKEN"
API_URL = "https://api.miniviz.net"
IMAGE_PATH = "image.jpg"
LABEL_KEY = "camera_1"

# Encode image to base64
with open(IMAGE_PATH, "rb") as f:
    image_data = f.read()
image_base64 = base64.b64encode(image_data).decode('utf-8')

# Send request
url = f"{API_URL}/api/project/{PROJECT_ID}/image"
payload = {
    "timestamp": int(datetime.now(timezone.utc).timestamp() * 1000),
    "label_key": LABEL_KEY,
    "image_name": os.path.basename(IMAGE_PATH),
    "image_base64": image_base64
}

try:
    response = requests.post(url, json=payload, params={"token": TOKEN})
    response.raise_for_status()
    print("✅ Send successful")
    print(response.json())
except requests.exceptions.HTTPError as e:
    print(f"❌ Error: HTTP {e.response.status_code}")
    print(e.response.text)
except Exception as e:
    print(f"❌ Error: {e}")
```

### Viewing Images

- You can preview sent images from the database page
- You can also display images in charts from the chart creation page
  - [Create New Chart] -> [Select Chart Type] -> Select [image]

---

## Summary

Miniviz provides the following features:

1. **Data Transmission**: Send sensor data from IoT devices
2. **Data Visualization**: Check data in the database
3. **Chart Creation**: Visualize sent data in charts
4. **Notification Configuration**: Send notifications via Slack or Webhook when thresholds are exceeded
5. **Image Transmission**: Send and visualize image data (Pro plan)

API Endpoints:
- Data transmission: `POST https://api.miniviz.net/api/project/{project_id}?token={token}`
- Image transmission: `POST https://api.miniviz.net/api/project/{project_id}/image?token={token}`

Constraints:
- Payload: Maximum 8 keys, 400 bytes, flat structure only
- Images: 200KB max, 60 seconds/image, Pro plan only